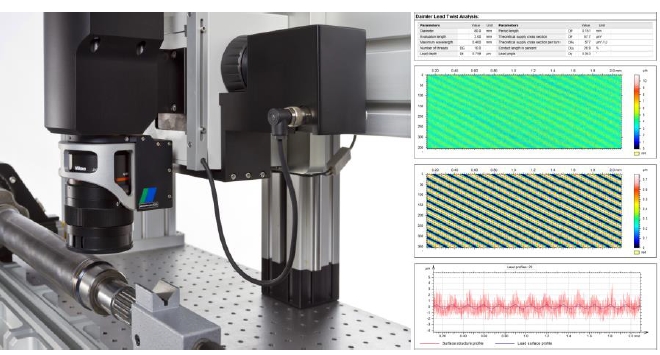
Jena, Germany and Besançon, France – 6 June 2013. Integrating MountainsMap analysis software from Digital Surf, the new Portal System from Confovis measures and analyzes shaft sealing surfaces fast and with very high accuracy in accordance with the Daimler automotive industry standard MBN 31 007-07.
The surface texture of lead structures imprinted on shaft sealing surfaces influences the flow characteristics of fluid in the contact zone between sealing surfaces and lip seals. It has a major impact on seal efficiency and leak-tightness. Lead structures consist of continuous or interrupted threads at an angle of zero or a few arc minutes to the circumference of the axisymmetric sealing surface or, in the case of structures with a higher number of threads, at even larger angles. In addition lower frequency macro lead structures and higher frequency micro lead structures are distinguished. In accordance with the Daimler standard lead structures are measured by obtaining 72 scan lines with a length of 2 mm using a rotation unit. The measurement data is analyzed in accordance with Daimler’s second generation lead analysis algorithm.
The Confovis Portal System scans a complete surface area instead of single spots point-by-point. In this way it provides a very high scanning speed and reduces processing time for this application significantly. The Portal System integrates high-quality microscope components from Nikon. With a 2.15 mm x 1.4 mm field of view the Nikon objective lens makes it possible to obtain each 2 mm scan line in one single measurement step. Complex “stitching” is no longer necessary. High resolution measurement down to a nanometer is achieved using a Z-positioning piezo actuator.
Once the measurement data has been obtained, MountainsMap automatically generates an analysis report in accordance with Daimler MBN 31 007-07, by running the second generation lead twist analysis algorithm under license from Mercedes-Benz.
“The Confovis Portal System with MountainsMap speeds up lead twist analysis by measuring lead structures in five minutes with demonstrated 99% correlation with results obtained by tactile system and then generating the analysis report automatically,” stated Frank Thielert, CEO of Confovis. “Automotive component manufacturers using the system get reliable results quickly and cost-efficiently.”
“Thanks to the licensing agreement with Mercedes-Benz, MountainsMap is able to provide a lead twist analysis report in accordance with the MBN 31 007-07 standard automatically,” stated François Blateyron, COO of Digital Surf.
Confovis is a high-tech company working since 2007 in the field of optical surface test and measurement instrumentation. Confovis develops and manufactures confocal upgrade kits for conventional microscopes, complete surface inspection systems as well as OEM components for industrial applications. Confovis 3D measurement solutions are ideal for semiconductor and flat-panel inspection tasks and to measure micro-geometry, roughness, step heights, micro-texture, thickness of transparent layers and more. www.confovis.com
Digital Surf, founded in 1989, specializes in providing surface analysis software for all types of surface metrology instrument including 2D and 3D profilometers, optical microscopes, scanning probe microscopes, scanning electron microscopes and hyperspectral instruments. Imaging and analysis software based on Digital Surf’s Mountains Technology® is integrated by leading instrument manufacturers and is used in thousands of laboratories and industrial facilities working in numerous sectors including aerospace, automotive, cosmetics, energy, MEMS, materials research, medical, metallurgy, nanostructures, optics, paper, PCB, plastics, polymers, printing, semiconductor, etc. www.digitalsurf.com

